|
QXRD
0.11.16
|
When you first run qxrd you'll see the (rather overwhelming) 'default' screen layout, shown below
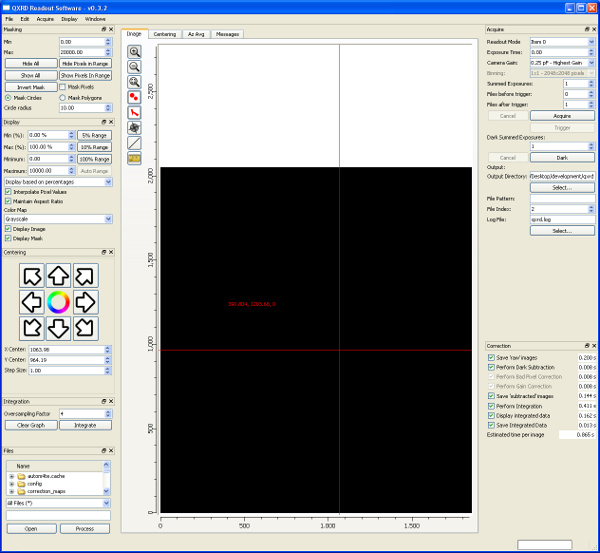
The first thing you'll probably want to do is to rearrange the QXRD control panels into a more efficient arrangement. You can do this by clicking and dragging on the title bars of the individual control panels and stacking them all in two main groups on the right hand side of the screen, as shown below. You can drag each panel into any of four areas around the border of the qxrd window, on top of another panel (the panels will stack), alongside another panel in the same border area, or as a floating window. You can also hide a panel by clicking its close button. If you hide a panel you can re-show it by choosing the corresponding command from the QXRD 'Windows' menu.
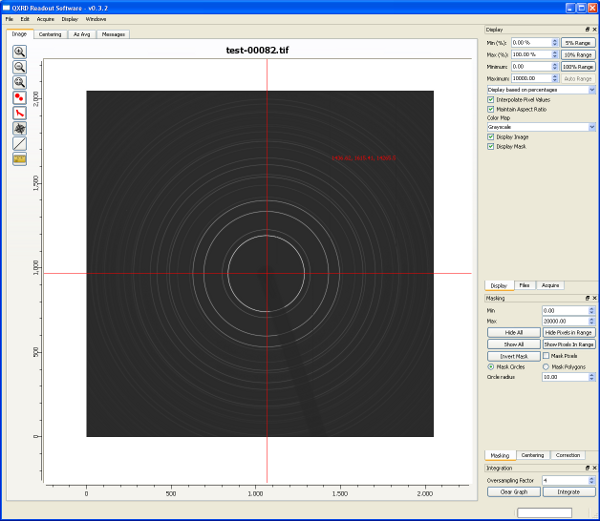
QXRD will remember the panel arrangement and window size between runs.
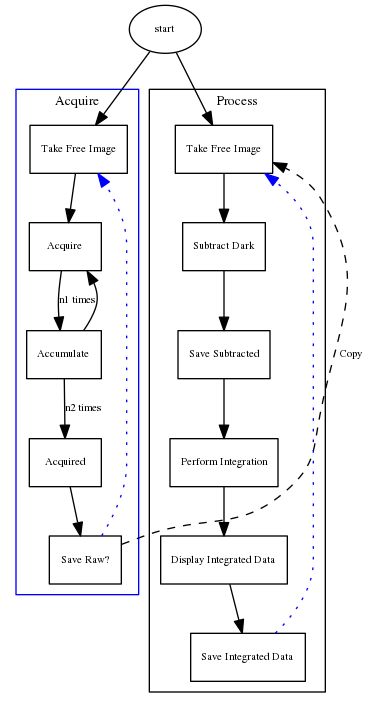
Two control panels are important for data acquisition, the 'Acquire' panel and the 'Correction' panel. The acquire panel is concerned with the data acquisition process itself, with parameters such as the exposure time, number of images to acquire and output directory choice. The correction panel is used to control what post processing steps are applied to the data after acquisition. On a sufficiently fast system the correction steps are performed entirely in parallel with the acquisition steps, but on slower systems it may be desirable to omit some post processing steps to allow the acquisition to proceed at the maximum speed.
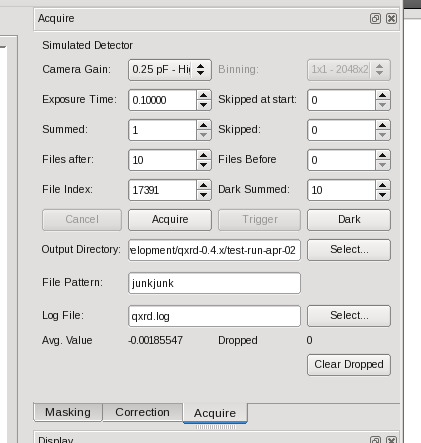
The 'Acquire' Panel | The acquire panel is where you enter parameters related to the basic acquisition operation. The result of an individual acquisition operation consists of a sequence of image files, each containing the sum of a number of individual exposures. The 'Readout Mode' and 'Exposure Time' controls specify the individual exposure (or integration) time. 'Readout Mode' lets you choose from a set of 8 pre-set exposure times and 'Exposure Time' lets you specify an arbitrary exposure time. The two controls are redundant to a certain extent and in practice it is sufficient to keep the 'Readout Mode' control set to the fastest rate and control the exposure entirely with the 'Exposure Time' control. The maximum 'supported' time for the Exposure Time is 5 seconds, but you may find that (depending on which model of detector you have) you can specify longer exposure times, perhaps as high as 8 seconds. The 'Camera Gain' control specifies the analog gain of the camera readout electronics, the highest gain setting is probably the one to choose here. If you have strong signals and want to perform long exposures it may be advantageous to reduce the analog gain to avoid saturating pixels. If you change the exposure time or camera gain you should always measure a new 'dark' image. The 'Binning' control is intended to allow you to choose between various binning options for the images - it doesn't work yet, however. The 'Summed Exposures' control lets you specify the number of individual exposures to add together into each saved file. If you choose a 'Summed Exposures' value of 1, then the individual raw images are saved as 16 bit integer TIFF files - about 8MB each. If you choose a larger value for the summed exposures the raw images will be saved as 32 bit integer TIFF files - about 16MB each. The choice of data types implies that you can sum as many as 65535 exposures without losing information - this should be sufficient for all reasonable circumstances! The 'Files before Trigger' and 'Files After Trigger' controls are used to specify the number of image files to save. In most cases you won't want to use the 'Trigger' option so you should set the 'Files before Trigger' control to zero. In this case acquisition and image saving will start as soon as you press the 'Acquire' button and will continue until 'Files After Trigger' images have been saved. If 'Files before Trigger' is non-zero then the acquisition is a little different - acquisition starts immediately but summed image files are not saved to disk, only to the computer memory. Only the most recent 'Files before Trigger' images are saved in this way but acquisition will continue by discarding earlier images from memory. To start saving files, click on the 'Trigger' button. At this point the pre-trigger images will start to be saved to disk, and an additional 'Files After Trigger' images will be acquired and saved to disk. 'Dark Summed Exposures' controls the number of exposures to add together for the 'Dark' image. The individual exposure time is controlled by the same controls used for the Acquire operation. The number of exposures for a dark exposure need not match that used during acquisition - the values will be scaled appropriately. 'Output Directory' displays the path to the directory where data files will be saved, to change to a new directory click the 'Select..' button and choose a new output directory. The 'File Pattern' and 'File Index' controls are used to specify the file names used to save files. The actual file names used to save a file will be of the form "<filePattern>-<fileIndex>.tif", "<filePattern>-<fileIndex>.dark.tif" or "<filePattern>-<fileIndex>.raw.tif". The file index is automatically incremented each time an image is acquired. QXRD will never overwrite an exisiting file - if this is attempted the new file will be saved with a name along the lines of "<filePattern>-<fileIndex>-<duplicateIndex>.tif" where duplicateIndex will be incremented from one until a unique file name results. Finally, the 'Log File' indicator displays the path name to a 'log' file which will contain all the messages that appear in the 'Messages' tab, together with the results of any slices and/or integrations of the images. Click 'Select...' to choose a different log file. The log file format is basically the same format as that used by 'spec'. |

The 'Correction' Panel | The 'Correction' panel is used to control which of the available automatic processing steps are performed when images are acquired. Alongside each step is an estimate of how long it is likely to take, averaged over the last 10 or so images - you can use these estimates to determine if you may need to skip some processing steps in order to maintain the desired acquisition data rate. The estimated times are measured when you run an acquire operation and a running average value is displayed in the panel. Do an acquisition of 20 or so images to get decent values for the timings. Be careful which steps you choose to omit - you probably don't want to perform measurements where nothing is saved, so you'll probably want to keep at least one of the 'Save' steps. A safe choice would be to choose all steps - this should give a total processing time of about 0.5 seconds. The best choice for rapid data acquisition would be to save the 'raw' images and nothing else - you would then do the dark subtraction and integration in subsequent analysis. |
 1.8.10

